This document describes the simple workflow of capturing accurate cell tower data using the Drone Harmony Tower Scanner.
Tower Scanner is a product included in the Android mobile application combined with the Drone Harmony Web App. Some steps of the planning workflow can be done in both apps. In such cases, the workflow in both apps is presented below.
The app is designed to allow a good combination of flexibility and simplicity. Drone Harmony supports customers and partners with training. If you are interested, please reach out to sales@droneharmony.com
Compatibility
At the moment, the tower scanner app is fully compatible with the following drones: DJI M3 series, DJI M30 series, DJI M300, and M350.
Suggested best drones/payloads options:
1. M3 Enterprise series, both M3E and M3T
2. M30 and M30T
3. M300/M350 in combination with P1 payload or H20
4. M300/M350 with Phase One
5. Coming soon: M300/M350 with Sony Alpha
Installation and License
Tower Scanner requires a Drone Harmony Enterprise license to use. If you still do not have one or need a trial license, please contact sales@droneharmony.com.
To install the app, download the installation file (*.apk) from this link: mobile app with tower scanner version 2.7.3 included and install it on your mobile device (or DJI RC Pro, Smart Controller, etc.)
The web app is accessible in your browser through the usual link: app.droneharmony.com
Flight Planning (5-15 minutes)
Mission planning contains two short steps: Tower Setup and Flight Planning.
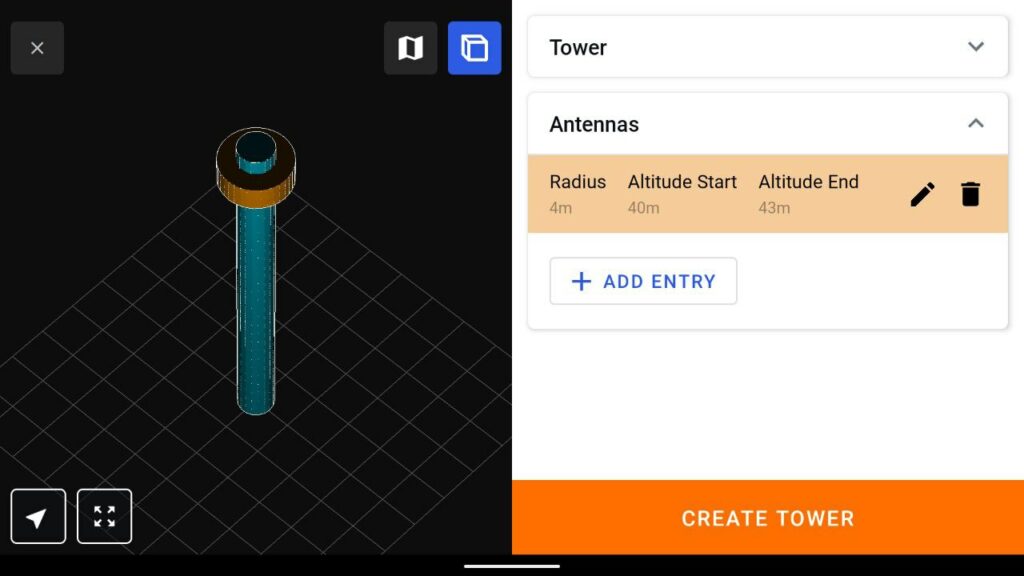
Step 1: Tower Setup (mobile app workflow shown)
The following steps are required to set up a tower model. The 3D view helps you visualize the tower model you are creating.
- Choose the tower tool from the left-side menu
- Place the tower center on the map
- Provide a name, the height, and the radius of the tower
- Create antenna racks (zero or more), this would be important for some of the plans
- Confirm by clicking on “Create Tower”
Important: If you created the tower in the web app, you should save it as a Site before proceeding to flight execution.
Tips:
- You can add more than one antenna rack.
- You do not need to position the tower center very accurately during the planning stage. This position will be calibrated during flight execution.
- If you are creating the tower in the web app, you can use exact GPS coordinates as an input form for the tower center.
Step 2: Flight planning
To ensure effective flight planning for optimal data acquisition, it’s crucial to tailor your approach based on the tower type and purpose of the inspection. Here are some general recommendations that should yield high-quality results:
- Overview Mission: Begin with a simple orbit around the tower from an overhead perspective. The emphasis here is on capturing the entire tower, prioritizing the scene’s overall context over intricate details.
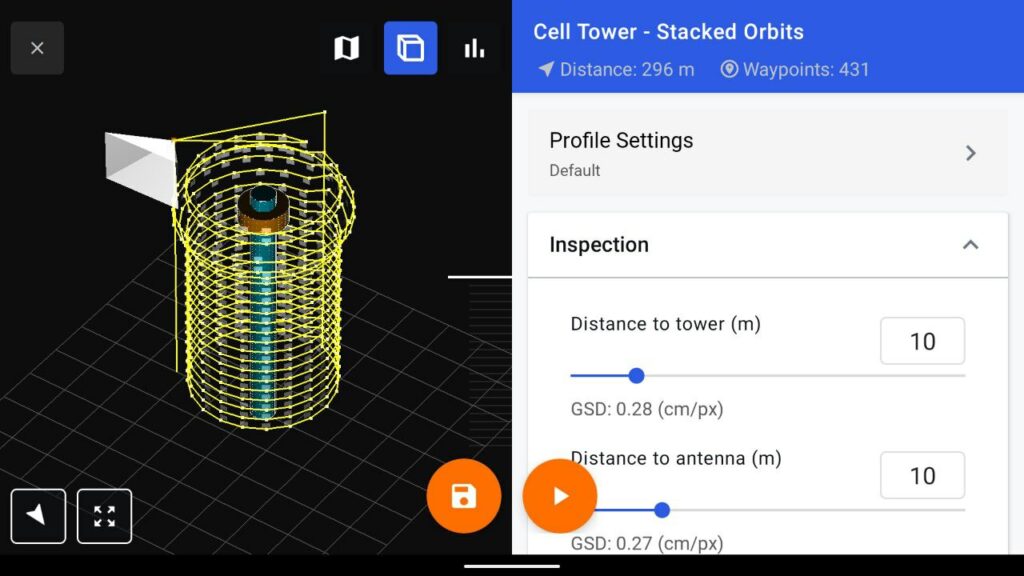
- Comprehensive Tower Mission: Execute a stack orbit mission covering the entire tower, incorporating a subtle gimbal angle. This mission is designed to capture the complete tower structure.
- Vertical offset between waypoints: 2-4 meters
- Distance to the tower: 5-10 meters
- Gimbal angle: -15 to 15 degrees
- Antenna Detail Mission: Implement another stack orbit mission focused specifically on the antennas, utilizing a distinct gimbal angle to capture detailed information.
- Vertical offset: 2-4 meters
- Distance to the tower: 5-10 meters
- Gimbal angle: -20 to -40 degrees
For the second and third missions, explore the option of setting a positive gimbal angle for one and a negative angle for the other, provided your camera allows it. This approach enhances the ability to capture nuanced details both above and below the antennas, addressing potential obstructions.
By adhering to these mission plans, you’ll navigate your flight effectively, ensuring a well-rounded and detailed 3D model tailored to the specific needs of your inspection.
Mobile/Web planning
The following steps will allow you to plan a flight mission.
- Tap on the “+” sign both in map view and 3D view to enter the plan catalog in the mobile app. In the web app, it is the blue “+” in the bottom right corner. Choose the desired flight pattern.
- Choose take-off and landing location.
- Adjust mission parameters if needed. Previously parameters will be cached.
Mobile: Tap the orange button to finish.
Web: Click on “Save” to finish - The mission is ready

Flight Execution (10-30 minutes per plan)
The flight execution requires the drone to be connected. You will see the drone telemetry and the FPV view appear on the screen.
Calibration
The calibration is a short manual mission that is designed to ensure that the flight execution is accurate and safe.
The calibration process would start automatically after each new battery change (unless hot-swapping is used for drones that have 2 batteries), it is a short manual 2-step mission that includes horizontal and vertical calibration.
Vertical Calibration (calibration of the tower`s height)
1. Fly the drone manually to the height of the tower top
2. Direct the camera gimbal forward (pitch 0 degrees)
3. Approve the calibration when the drone is at the same height as the tower top
Horizontal Calibration (calibration of the lat/long position of the tower)
- Fly the drone above the tower and direct the gimbal down (-90 degrees)
- Approve the calibration once the tower is well-centered in the Red Cross
You can always reset the results of the previous calibration or initiate the same calibration process as before the mission launch, here are the steps to access it:
- Choose Menu -> Drone -> Calibration
Once the tower center is calibrated, a green circle will appear on the telemetry panel at the top of the screen. You will also see the shift that was made with calibration when tapping on the green circle.
Mission Execution
After the tower position has been calibrated, tower missions can be executed.
Mobile App
- Tap on the mission tab and choose the mission to execute.
- Tap on Launch to prompt the launch dialogue
- Choose launch parameters.
Important parameters:
- Flight speed (recommended is around between 0.7 and 1.2 m/s, so camera shutter will have enough time)
- RTH Altitude (set to be higher than the tower and obstacles around it)
- Recording Type (Photo Non-stopping is recommended)
- Focus Handling (Set by the pilot by tapping on the screen, or automatically by the app for the following plans: Stacked-Orbits, Verticals, Helix)
- Dewarping (Depends on the post-processing which you are going to make after data collection)
Parameter choices will be cached for future flight executions.
For technical questions, please contact support@droneharmony.com
For sales/business questions, please contact sales@droneharmony.com


